One key per tool
No menus: press the letter and draw. Try clicking each one.
Arrow A So nobody has to hunt for what you mean.
Eyedropper I
10 colours + 10 of your own with the dropper · ⌘ZCtrlZ undoes

 CAPTURAYA
Press your shortcut, pick the area, point out what matters and paste it wherever you like. Free for Mac and Windows. Nothing leaves your computer.
Help installing on MacClick here the first time you use itThe Windows version is almost here. Come back in a few days and you'll find it right here.
You're on your phone: Capturaya is for computers.

No windows to open, no files to save along the way, no hunting for where the screenshot ended up.

The screen freezes exactly as it is, menu bar and Dock included on Mac, or the taskbar on Windows. Anything that was moving stays still so you can catch it.

Pick the area while you see its size in real pixels. Point with an arrow, draw a box, type, or pixelate anything that shouldn't be seen.

⌘CCtrlC or Enter and it's on your clipboard. Then ⌘VCtrlV into a chat, an email or a document.
Just what you need to explain something with a picture. Done well, and fast.
No menus: press the letter and draw. Try clicking each one.
Arrow A So nobody has to hunt for what you mean.
Turn the mouse wheel while you draw: from 1 to 36 px, with a stroke preview.
Hold Shift: perfect squares and circles, lines at 45°.
Real pixel measurements, 8 handles to adjust and drag to move. ⌘ACtrlA grabs the whole screen.
Menu bar and Dock included (on Windows, the taskbar). Got several monitors? Those too.
It comes set to ⇧⌘X on Mac and CtrlShiftX on Windows, but in Settings you just press whatever combo you fancy and it sticks. It lives in the menu bar (Mac) or the system tray (Windows), no open windows, and it can start on its own when you turn on your computer.
Your screenshots never leave your computer. No account to create, no ads, no paid version waiting around the corner. The only thing Capturaya does online is check for a new version, without sending anything of yours. You take it, you paste it, done.
It comes set to ⇧⌘X on Mac and CtrlShiftX on Windows, but you can swap it for any one you like in Settings. It saves instantly, no restart needed.
Click its icon: in the menu bar, top right, on Mac; right-click it in the system tray, next to the clock, on Windows.
On Mac, ⌘, also works while the menu is open.
The box switches to “Press the shortcut…”. Press the new combo, with at least one modifier key, and you'll see “Saved”. If another app already uses it, it tells you and you try another. Esc cancels.
Try it here: click the box and press a combo.
Click and press the combo. Default is ⇧⌘X.
✓Open Capturaya at loginClick and press the combo. Default is Ctrl+Shift+X.
✓Open Capturaya when Windows startsOn Windows they're the same, just swap ⌘ for Ctrl. The capture one is only the default: change it to whatever you like in Settings.
| What it does | Mac | Windows |
|---|---|---|
| Capture (change it in Settings) | ⇧⌘X | CtrlShiftX |
| Select the whole screen | ⌘A | CtrlA |
| Copy to clipboard | ⌘C or Enter | CtrlC or Enter |
| Save as PNG | ⌘S | CtrlS |
| ⌘P | CtrlP | |
| Undo | ⌘Z | CtrlZ |
| Close | Esc | Esc |
| Pencil · Line · Arrow · Rectangle | PLAR | |
| Ellipse · Highlighter · Text · Pixelate | EMTX | |
| Stroke width (1–36) | Mouse wheel | |
| Perfect shapes and 45° lines | Hold Shift | |
Two minutes. And if a warning pops up, here's exactly what to click.
Download Capturaya-1.4.dmg, double-click to open it and drag the Capturaya icon into the Applications folder. Then you can eject the disk.
Works on Apple Silicon and Intel Macs, macOS 14 Sonoma or later.

macOS will say it can't verify the developer: the app is free and isn't signed by Apple. That's normal. Go to
System SettingsPrivacy & Security
scroll down to the Capturaya message and click “Open Anyway”.
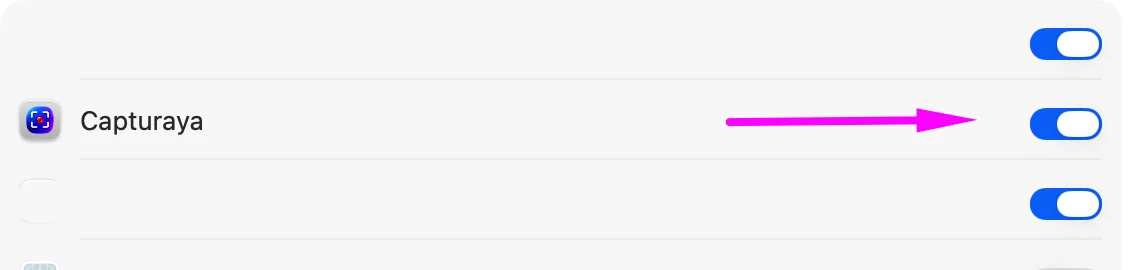
System SettingsPrivacy & SecurityScreen & System Audio Recording
Turn on Capturaya and open it again.
Why does it ask? macOS requires this permission for any app that can see what's on your screen, whether it's a screenshot tool or a video call. Capturaya only uses it to take the screenshot when you press the shortcut, and the image stays on your Mac.
You'll see the icon in the menu bar. Press ⇧⌘X and start capturing. Prefer another combo? Change it in Settings, where you can also make it open at login.
Download Capturaya-Setup.exe and open it. For Windows 10 and 11.
That's SmartScreen warning you that the app doesn't carry a paid commercial certificate. Click “More info” and then “Run anyway”.
It installs itself, sits in the system tray next to the clock, and starts with Windows. Press CtrlShiftX to capture, or change the shortcut in Settings (right-click the icon).
The first time, macOS gets a bit dramatic. It takes two minutes and it's all here in one place. The screenshots are from a Mac set to Spanish: on yours the buttons are in English, in exactly the same place.
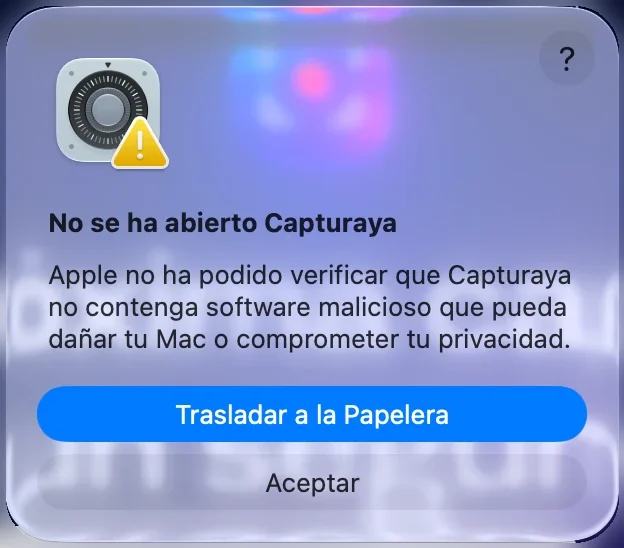
One thing the first time
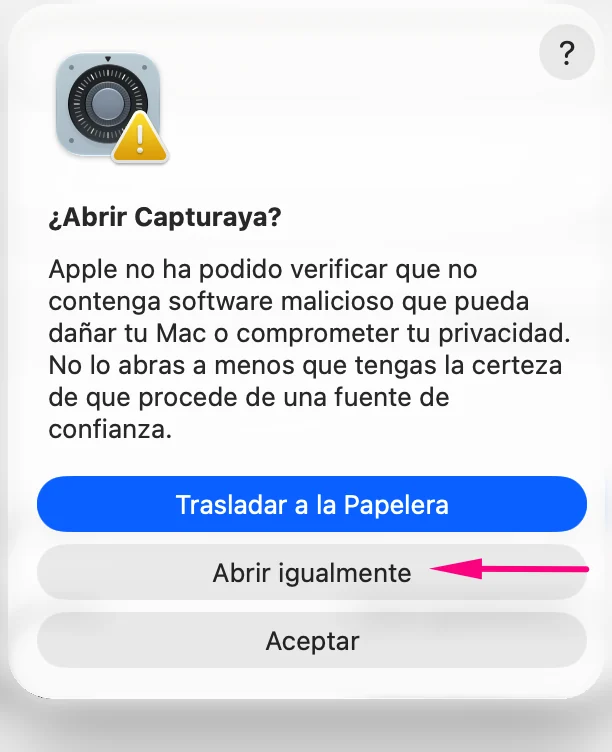
macOS will show this message with two buttons. Choose “Done”, the grey one. The blue one (“Move to Trash”) would delete it. It’s a normal Apple step for apps that don’t come from its store.
Apple charges €99 a year to anyone who wants their apps to show up as “verified”. Capturaya is free and doesn't pay that toll, so macOS, just in case, treats it as suspicious and throws up scary warnings: “may harm your Mac”, “compromise your privacy”… It says that about any app that hasn't paid up, not because it spotted anything odd in this one.
What Capturaya actually does: it takes a picture of your screen when you press the shortcut, lets you draw on it, and copies or saves it. No accounts and no uploads: it only goes online to check for a new version, and it asks you before updating. The image never leaves your Mac unless you paste it somewhere.
As for the second permission, Screen & System Audio Recording, macOS asks for it from any app that needs to see what's on screen: Apple's own screenshot tool, Zoom, Teams, OBS… Without it, Capturaya would only see your empty desktop background.
You only grant the screen permission once, and it sticks when you update. The “Open Anyway” warning may come back when you download a new version: you clear it the same way, in a minute.
Double-click Capturaya in the Applications folder. macOS will say it can't verify it and won't open it: click “Done” (not “Move to Trash”). That attempt is what makes the unlock button show up.
Apple menu (the apple, top left) → System Settings…
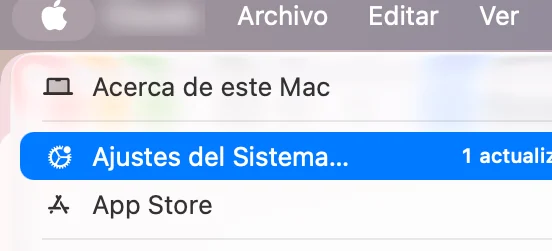
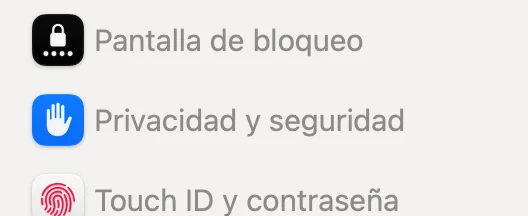
In the left-hand column.
You'll see “Capturaya was blocked to protect your Mac.” If it's not there, go back to step 1.
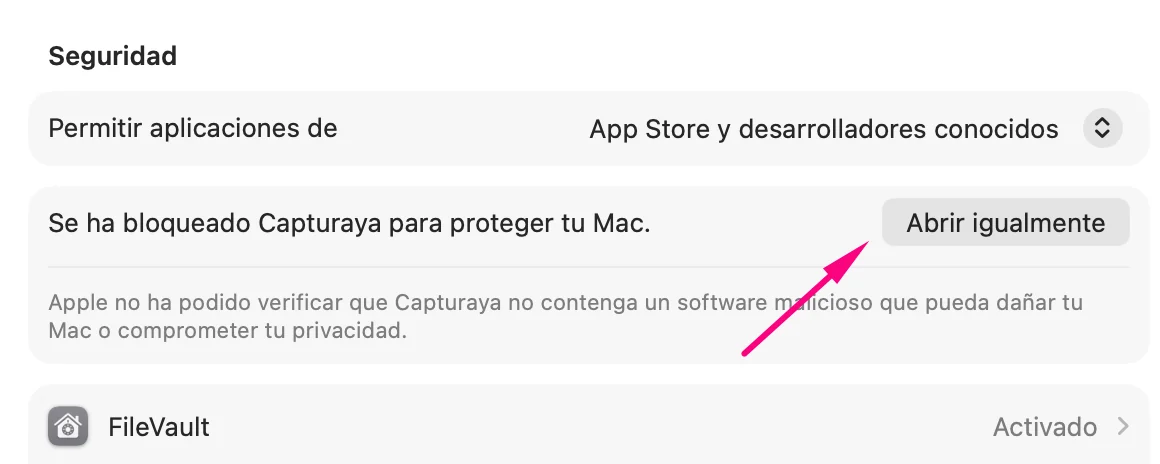
Don't click “Move to Trash”: it's the big blue button, but it's the one you don't want.
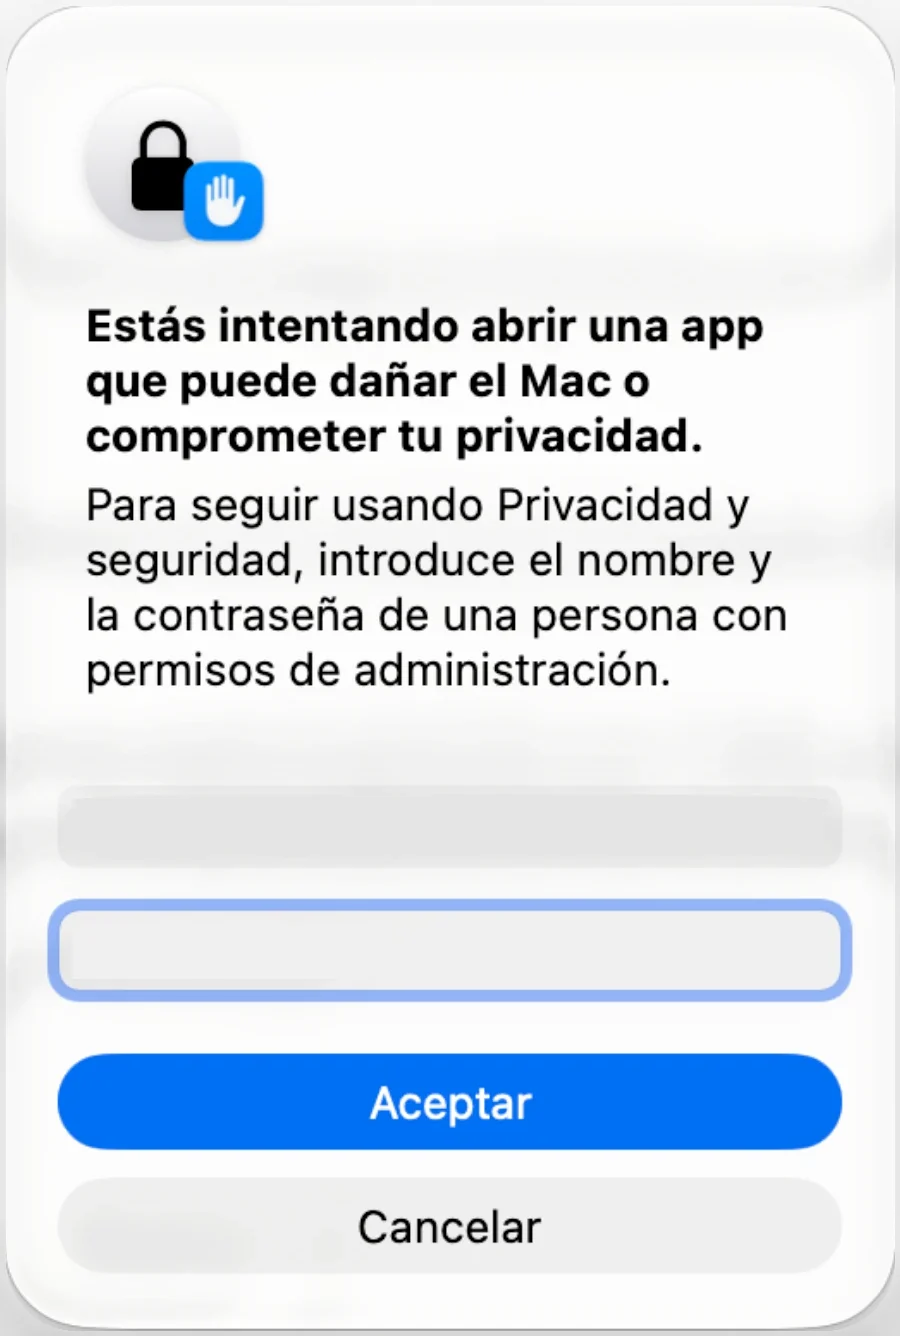
macOS wants whoever's in charge of the Mac to approve it.
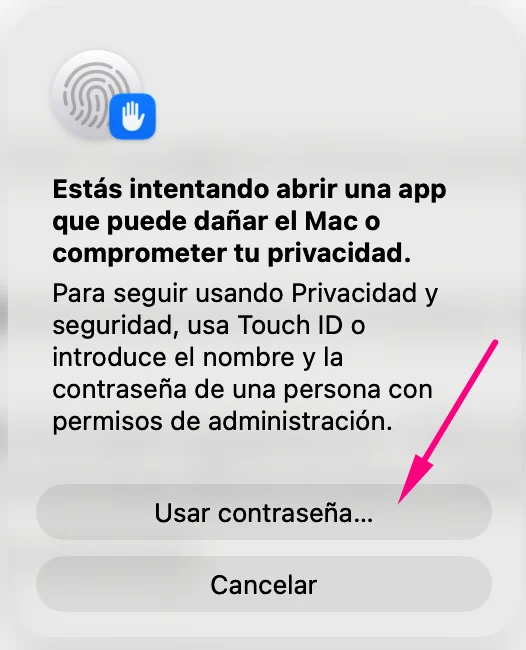
The same one you use to log in. It stays on your Mac: neither Capturaya nor anyone else sees it. That's it, from now on it opens without asking.
It's on the same page as before, a little further down.
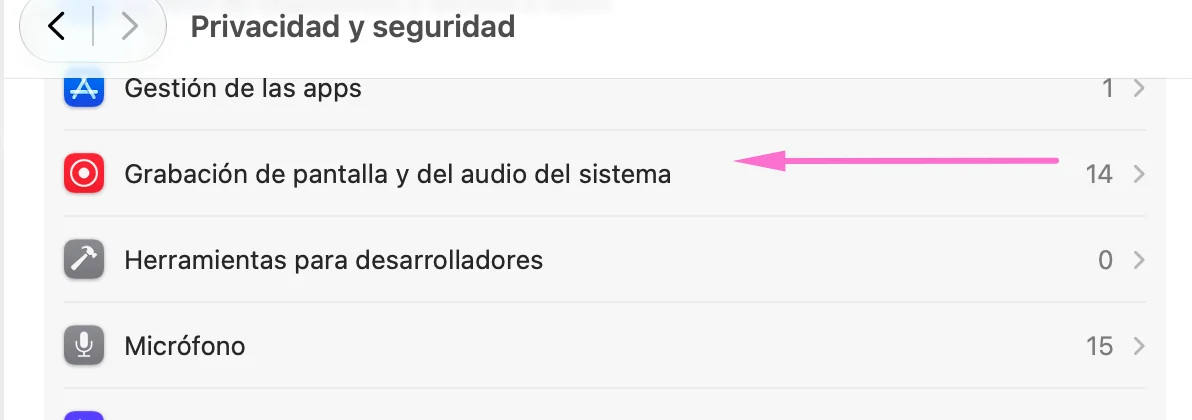
If it asks to quit and reopen Capturaya, say yes. From then on, the shortcut captures.
What changes in each version. You can see which one you have in “About Capturaya”.
Yes. No paid version, no ads, and no account needed. Download it and use it.
No. Everything happens on your computer: the screenshot goes to the clipboard, or to a PNG if you save it. Capturaya doesn't send anything of yours online; the only thing it checks is whether there's a new version.
Because the app isn't signed with a paid certificate from Apple or Microsoft. macOS and Windows always warn you in that case, whatever the app. Just click “Open Anyway” on Mac or “More info → Run anyway” on Windows, only the first time. See the steps with screenshots.
From the Capturaya icon (menu bar on Mac, system tray on Windows), open Settings and record whatever combo you prefer. The default is ⇧⌘X on Mac and CtrlShiftX on Windows.
Yes. When you press the shortcut, every screen freezes and you can select on whichever one you like.
On Mac, quit it from its menu bar icon and drag Capturaya from Applications to the Trash. On Windows, go to Settings → Apps, find Capturaya and click Uninstall.

Capturaya is free and always will be. If it saved you some time and you feel like it, Buy me a coffee · €1
Copied (pretend copy here: in the app it really goes to your clipboard)
That quick. To show an error, point something out on a website, share info without retyping it, or send a piece of your screen to anyone: snap it, mark it, paste it, faster than you can say it.
